
The world of captured lights


Way back in the 19th century (that's W-A-Y before digital cameras were on the market) Gustave Le Gray developed the idea of using several differently exposed images to reproduce an extreme range of luminance to produce seascapes which showed the detail and subtle tonal differences in both the sea and the sky. And yes, he used negatives, dark room and developer!
HDR was invented! A long time before anyone even conceived of the idea of digital photography. SO like so many of what the film purists call "these new fangled digital tricks", the HDR we do today has its roots in film photography.
But the one thing that has changed is how easy it is to do today. No more dark, wet, chemical ridden dark rooms. We produce brilliant HDR images sitting in the comfort of an office chair, enjoying daylight and even sipping a cup of coffee.
So what is HDR used for? Simple. To add more "dynamic range" to an image. It increases the contrast between highlights and shadows whilst retaining (or even enhancing) all the detail. It gives the image a crispness that increases its visual impact.
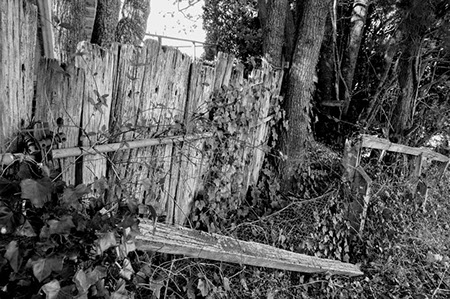
Have a look below at what can be achieved ....
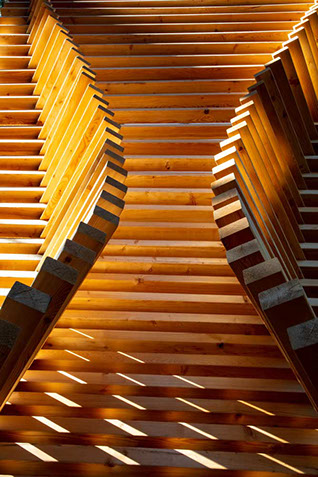

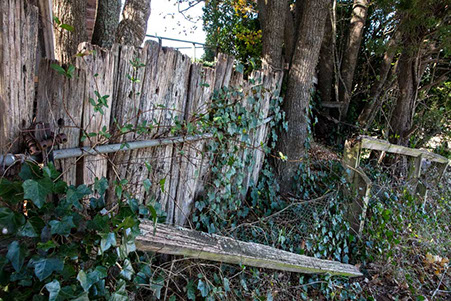
Unedited image, as shot, straight out of the camera (Canon 5DsR with 24 - 105 L series lens)
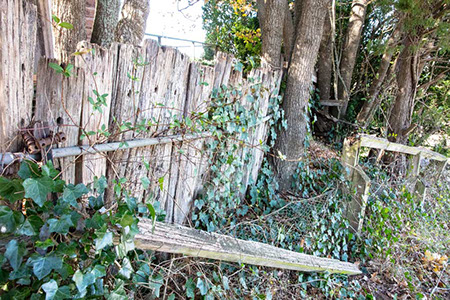
HDR image of same shot using Photomatix Pro and Photoshop, but with NO colour enhancement
And you know, it's not that hard! All you need is some imagination and a bit of patience plus the right software. I use a terrific program called PHOTOMATIX PRO (see https://www.hdrsoft.com/) which is easy to use and gives me lots of options and control ... it's not automatic, you have to make your own choices, so you do need to experiment).
Rather than go on forever and try and explain it in words, let me show you in images how easy it is, the steps you go through and the sort of options available. I've taken a shot I did while wandering round the Southern Highlands of NSW one day and shown each stage from the out of camera JPEG contrasting with the out of camera RAW, all the way to just four examples of the 40 or so HDR options available in Photomatix Pro (and each of those is adjustable as well.
OK, here we go ... but do remember your monitor may not be tuned are capable of seeing some of the subtle differences between some of these images, but the differences are there I promise you.
Out of camera unedited JPG
Out of camera unedited camera RAW file - note improved quality
CORRECTLY EXPOSED RAW file with minor adjustments to clarity, haziness, saturation and sharpness
One stop UNDER EXPOSED RAW image with same adjustments as correctly exposed shot
One stop OVER EXPOSED RAW image with same adjustments as correctly exposed shot
Three or more images or required to be combined to make an HDR image - one correctly exposed, one under exposed and one overexposed. This gives you details in mid tones, shadows and highlights in the different images.
Now we have three differently exposed shots of the same scene the next step is to import them into Photomatix Pro, combine and align them (which the software does for you) and move on to selecting the HDR effect you feel best reflects your creative vision. Here are FOUR of the 40 or so options available in Photomatix, and each of those is adjustable to exactly suit the effect your want to achieve. But do be aware, it's not quite as simple as A-B-C, so you do need to experiment and learn how to use it before you try and produce your award winning photo.
One drawback? File sizes! Without any subsequent editing in Photoshop these HDR files are over 290 megabytes. And with editing I have produced files that are over 2 gigabytes (you need to change format once you hit that barrier from PSD to Large file format). But with the ever decreasing cost of disc space, file size is not a serious obstacle for most people.

Basic conversion to HDR image - "Detailed"
More creative conversion to HDR image - "Painterly 5"
More extreme conversion to HDR image - "Surreal 2"
Monotone conversion to HDR image - "B&W Photographic"
You don't have to use Photomatix to do HDR, there are options to do it in Photoshop and the Nik suite does have a limited range of HDR options available. One word of warning though ... don't use HDR for the sake of using HDR. It's not to everyone's taste and it isn't suitable for every occasion. And you do need to bracket your exposures to make sure you have correct, under and over exposed images to combine.
Well, there you go. It's over to you now to have a try for yourself.